2016년 6월 30일 목요일

DENTAL AMERICAN TEST


하지만 엊그제 3개월 정도 준비 했던 시험을 치고 드디어 공부에서 해방되었어요
moon_and_james-4 

결과는... 음.... ㅋㅋㅋㅋ
이제까지 본것중엔 젤 잘보긴했어요..
호호호호
moon_and_james-2 


암튼 각설하고

오늘은 제가 며칠전 친 시험, DAT 에 대해 알아볼꼐요오. 아주 긴 글이 될테니 놓지지 말고 잘 따라오시길...
moon_and_james-34 


미국에선 치과의사가 되기위해서는 치과전문대학원 (Dental school) 에 들어가서 4년 과정, 면허시험 (Board) 두번 을 패스 해야해요. (헥....)

이런저런 다른것들은 또 다른 포스트에서 얘기하기로하고..
오늘은 DAT에 대해 알아볼께요.

시험을 치기위해서 가장 먼저해야할일은.

DENTPIN 을 만드는거에요..
이건 ADEA 웹페이지에가면 만들수있어요.

그리고 DENTPIN을 만들었다면 그걸 가지고 DAT를 응시하기위한 application을 보내고 난 후 2-3일 안에 승인 이메일을 받으시게 되요.
그럼 이제 prometric* 웹사이트에서 치고싶은 날짜와 시간을 정하면 된답니다.

*prometric은 DAT뿐만아니라 국가에서 인정하는 모든 computerized test, 즉 컴퓨터로 치는 시험은 모두 이곳에서 치게 되요.
예를 들면 고등학교 검정고시 (GED) 라던가 대학원 입학시험 (GRE) 의대입학시험 (MCAT) 등등등.. 이 있습니다.


시험날 예약한 prometric center로 가시면 사진이 있는 ID (여권이나 운전면허증 같은 정부에서 나온 ID) 와 크레딧카드나 데빗카드 같은 같은 이름 있는것 하나 더 보여주셔야해요. 이름은 꼭.꼭.꼭. DENTPIN에 가입하실때 쓰신 이름과 같아야해요. 
예를 들어.. 이름이 Dentpin에  Ji Young Kim으로 등록을 하셨다.. 하시면 가져가시는 아이디들 모두 Ji Young Kim 혹은 Ji Y. Kim으로 되어있어야하고 이름이 매칭 안되면 시험을 못보는 불상사가 일어날 수 있으니 DENTPIN만드실 때 가지고 계신 ID에 적힌 이름 그대로 기재하셔야해요. 특히 한국분들은 이름이 위에 예처럼 이름 한글자는 First name으로 나머지 한글자는 Middle name으로 나눠져 있다던가... middle name없이 Jiyoung 이라고 아예 first name에 두글자 다 쓴다던가 하시잖아요..... 아예 모든곳에서 둘중 하나로 정해서 쓰시면 상관이없는데.. 가끔 이방식 저방식 두개다 쓰는 분들도 계시니까... 꼭 확인 하시고 가세요..

체크인 하고 나면 락커를 하나 줘요.. 거기에 전화 끄고 넣으시고.. 소지품 모두 넣으셔야 해요.. (시계포함...) 혹시나 추울까봐 겉옷 가져가시는 경우 입고 계셔야 해요. 그냥 따로 들고는 시험장 안에 들어갈수없어요.

그리고 시험장 들어가기전 sign-in을 해요. 
아이디 확인 한번더하고.. 지문도 찍고.. 사진도 찍고... 바지나 자켓 주머니 뒤집어서 보여주고 금속탐지기로 검사도하고..
준비가 다 끝나고 들어가는 시간과 함께 사인을 하면 드디어 시험장 안에 들어갈 수 있어요.

들어갈 땐 scratch paper 2장과 펜 두개를 받으실 꺼에요.. 
시험장 마다 다르다고 들었는데 전 코팅된 grid paper와 wet erase pen 2개를 받았어요.. 
그냥 지워지는게 아니기때문에 더 필요하면 시험치면서 손을 들어 표시하시면 새걸로 바꿔준답니다..
그전에 썼던건 가져간다는거 알아두세요 ㅎㅎ

여기서 저의 자잘구레한 팁!! 빠-밤!
감독관이 밖에서 컴퓨터마다 설치된 카메라로 지켜보고있긴하지만.. 잠시 자리를 비운다거나 해서 바로바로 안 올수도있어요.
두장을 다 쓰고 바꿔달라 하지 마시고.. (혹시나 자리에 없으면 그 시간동안 종이 써야될땐 아무것도 못하니까요 ㅠㅠㅠ 우린 일분 일초가 아까워요...)
한장다 쓰시고 다음장 쓰기시작할때 미리미리 한장씩 바꿔 놓는것이 좋아요.


총 시험시간은 5시간 이에요,

엄청 길거같지만 막상 쳐보시면.....
정신차리면 모니터에 내 점수가 뙇!

moon_and_james-11
위에 알려드렸듯이 컴퓨터로 치는 시험이고..  또 모든 문제가 multiple choice 니까요
바로 결과를 알수있어요.


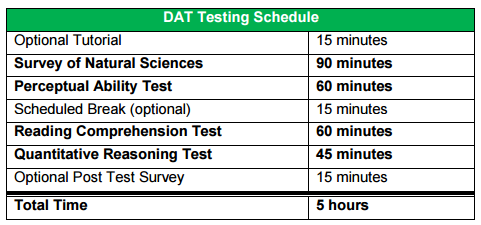
시험시작 전 선택적으로 tutorial 시간이 있는데요.. 전 이시간을 꼭 활용하시라고 말씀드리고 싶어요.
시험 치기 전에 내 마음과 몸을 딱 진정하게 해주는 효과(?) 랄까...ㅋㅋㅋ
그리고 시험치면서 꼭 필요한 이런저런 정보들을 알려주니
구지 15분 다 쓰지 않으셔도 그냥 한번씩 쭉쭉 읽어만 보시면 시험칠때 도움되실꺼에요 ㅎㅎ

그리고 PAT 섹션이 끝나고 15분 휴식시간이 있어요.. 
이 시간도 꼭. 꼭. 꼭!!!!! 쓰셔야 해요... 그 전 섹션들을 하면서 눈이 정말 많이 피곤해 지거든요.. 
특히 PAT 너어... (전 겁없이 그냥 빨리치고 나가고싶어서 처음 쳤던 시험에서 break 그냥 스킵하고 쭉 쳤다가 나중에 눈이랑 머리 터지는줄...ㅠㅠ)
그래서 RC섹션 시작 전에 눈 조금 감고 눈의 피로를 좀 풀어주시고... 뇌도 좀 쉬게해주시고...
물론.. 혹시나 화장실 가셔야하면.. 이때 가셔야 해요..
시험 치는 시간에 가시면 (물론 그럴일은 웬만하면 없어야하지만 사람일은 모르는거니까요..ㅎㅎ) 시간이 멈추거나 하지않아요.. 
아예 못나가게 하진않고 화장실 다녀올순있답니다.. 하지만 내 물건들을 꺼낸다거나 하는 일은 절대절대 없어야해요. (락커에 가게해주지도 않아요...ㅎㅎ)

여기서 또 팁하나 더! 혹시나 QR섹션에 쓸수있는 공식이라던가.. 간단한 conversion 같은것들은
문제풀때 갑자기 생각안날수도있으니까요ㅎㅎ 받으신 scratch paper에다가 끄적여 주시면 좋겠죠?
moon_and_james-31 


그럼. 이제 DAT에 어떤 문제들이 나오는지 한번 알아볼께요.
크게 Science, PAT, Reading Comprehension, Quantitatice Reasoning (수학) 로 나눠져요.

Science 섹션은 Survey of Natural Sciences 라고 불리고
Biology, General Chemistry, Organic Chemistry 이 세가지 섹션으로 나눠지며 총 100문제에요.
PAT (Perceptual Ability Test),  공간지각능력테스트.. 라고 하면 될것같네요. 90문제
Reading comprehension 독해.. 인가요?.. 암튼.. 50문제
Qualitative Reasoning 걍 수학이에요.. ㅋㅋ 40문제 입니다..
자세한건 아래 표를 봐주시길
moon_and_james-36 


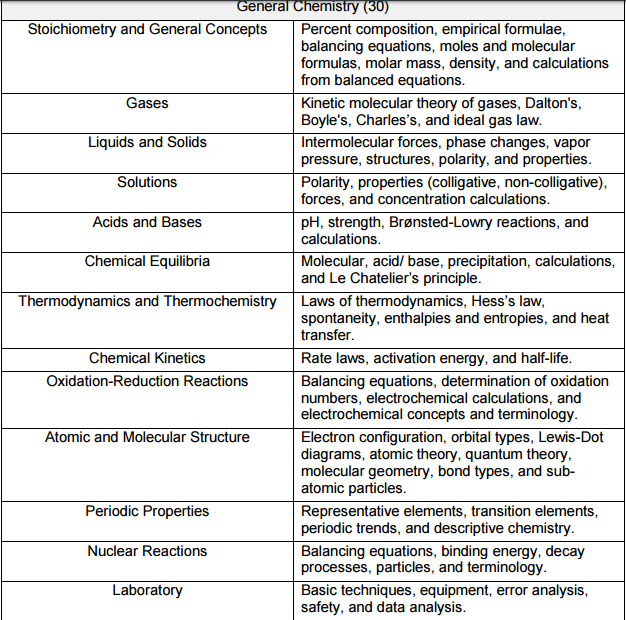
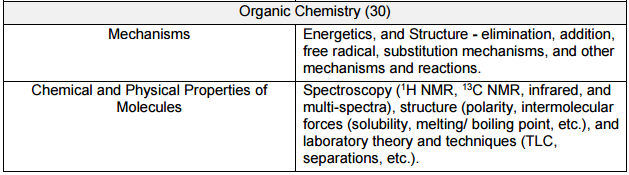
 뭐가 많죠??..... (또르르...)  그리고 마지막 수학 섹션엔 위에 있는것 말고도 Applied Math problem이 더 있어요.. word problem들...ㅎㅎ

참고로 이 섹션에선 계산기 사용이 가능하니 필요할때 후다닥 쓰시면 되어요.
(또 한가지 팁! 계산기쓰실때 마우스로만 클릭해서 쓸 수 있다고 알고계신분들이 많아요.. 그래서 시험준비하실때 계산기 일부러 안쓰는 걸로 연습하시는 분들 많이 계신데.. 키보드.. 쓸수있어요!!ㅎㅎㅎ 계산기 쓰는게 빠른 문제들도 있긴 있으니 알아두세용♡)


시험이 끝나고 나면 위에서 말했듯이 점수가 바로 나오고 밖으로 나오면 나온시간 쓰고.. 사인하고.. sign-out을 해요. 그리고 좀전에 모니터에 나왔던 점수를 프린트 해줍니당...


 꿈의 점수네요.. 다 30이라니.. 그냥 구글링좀 했어요 ㅋㅋ 근데 보니까 누가 뽀샵질 너무 티나게 해논거네요 ㅎㅎㅎ
그쵸... 아무리 천재도 저 점수는 가능한 점수가아니에요... 

엄마들 만점만점 좋아하는데... 저건 가능한 점수가 아니니 자식들 너무 부담주지 마세요..
moon_and_james-33 


암튼!! ... 이렇게 생긴걸 받으실꺼에요... ㅎㅎ

1-30 점이고.. 많은 학교들이 18점 이하는 아예 안봐주는걸로 알고있어요.. 보통 20점 이상은 되어야 원서를 내볼만...하다고들 해요
근데 사람마다 학교 성적도다르고.. 경험이라던지.. 다른 부가적인것들도 많이 보기때문에 꼭 몇점이어야 한다.. 그런것 없어요.
시험 끝나면... 더 힘든게 남아있는걸요..ㅋㅋㅋㅋㅋㅋㅋㅋㅋㅋㅋㅋㅋㅋㅋㅋㅋㅋㅋㅋㅋㅋㅋㅋㅋㅋㅋㅋ
바로 원서접수와 긴 기다림........
moon_and_james-56 


여러분.. 
적당한 부담과.. 노력과 시간은 세상 살아가면서 어떤 공부든, 어떤 일이든 꼭 필요한 거에요.
그래도 DAT는 노력하면 한만큼 꼭 점수가 나오는 시험이니
너무 우울해하지 마시고 시험공부하면서 궁금한게 있으시면 댓글달아주세요...
작게나마.... 도와드릴수있다면 도와드릴께요 
다음 포스트엔 DAT 공부하는 방법에 대해서도 얘기 해보겠어요.


그럼 전 이만..
moon_and_james-45 


아참! 저 위에 표들은 모두 ADEA 2016 DAT Guide에서 긁어온것들 이에요.
이곳에서 ㅎㅎ


The Dental Microscope in Endodontics [출처] The Dental Microscope in Endodontics|작성자 leica_micro

The Dental Microscope in Endodontics
In dentistry a bright, magnified view into deep cavities supports detailed diagnosis and precise therapy, particularly in the field of endodontics.

In this interview Dr. Dean Raicov explains the benefits of the dental microscope in his practice. Dr. Raicov is a dentist based in Röhrnbach, Germany and specializes in endodontics, parodontology, and prosthetics. He is a member of the European Society of Microscope Dentistry (ESMD) and the German Society of Endodontics and Paradontology.

Why did you decide to purchase a dental microscope? For which treatments do you use it?
Fig. 1: A root canal seen through the microscope.Dr. Raicov: I discovered the high degree of accuracy that can be achieved with a dental microscope during my studies in endodontics and I realized that there’s no real alternative. After all, how can you treat something you can’t see?

Using a microscope, there’s so much more potential for tooth preservation. And there is a large spectrum of medical treatment that can only be performed using a microscope, for example endodontic retreatment due to infections caused by side canals, insufficient root canal fillings or broken instrument parts.

I also think that the microscope lowers the risk of instrument breakage as you can create much better access to cavities.

Fig. 2: The Leica M320 MultiFoc Objective enables the surgeon to adjust focal length quickly and easily during surgery with just one turn of the adjustment knob.What advantages do you gain from working with the microscope? 

Dr. Raicov: The Leica microscope gives me the certainty that the treatment I have performed is correct. For prosthetic work, I can check the accuracy of the preparation. I have found the microscope to be a very useful diagnostic tool, too. Take sensitive teeth, for instance, in cases where the cause was difficult to identify, the excellent microscope optics and light revealed cracks, or we discovered a side canal during endodontic treatment. These are completely different diagnoses, and of course each requires different treatment.

So thanks to the dental microscope I can work more quickly and ultimately more successfully. I also greatly appreciate the microscope’s ergonomic benefits. However, if you work at the microscope for a very long time, musculoskeletal strain can still be a problem. So it’s important to adjust the microscope properly to your individual posture. 

You work with a Leica M320 Dental Microscope – which features of this microscope do you particularly appreciate in everyday usage? 
Dr. Raicov: The optics are of course indispensable for a good microscope. With the Leica M320 dental microscope I particularly appreciate the multifocal objective. In my view no microscope should be sold without one! I notice the advantages every day – if the patient moves slightly, the multifocal objective allows me to retain the focus and fine-adjust the field depth without having to alter the position of the microscope or move the whole dental chair unit up or down.

The multifocal objective makes work a lot faster and more convenient. I would wholeheartedly recommend it in particular for dentists who are just beginning to carry out treatments using a microscope.
Fig. 3: The Leica M320 dental microscope: Premium apochromatic optics and two LEDs deliver clear, bright, true-to-life color visualization and minimal cost of ownership.How do you like the LED illumination of the Leica M320? 
Dr. Raicov: I’m delighted with the LED illumination, the white light gives an extremely bright and clear image. In my opinion, there’s no alternative to LED illumination.
How do you consider the documentation options of the Leica M320 for your practice and for sharing with peers? 

Dr. Raicov: Some of my patients are referred by other colleagues, so we use the excellent documentation devices to discuss the treatment plan. Apart from that, photographs and video help me explain to my patients what’s wrong and what treatment they need. It’s simply easier for people to understand what’s happening if they see images. We take photos during every endodontic procedure and use them for in-house documentation purposes, too.

Not all dentists have experience of working with a dental microscope. What sort of learning curve could they expect? 

Dr. Raicov: In my experience, you mainly have to allow time for your team to get accustomed to the microscope. I personally received a training course on the Leica M320 that was of enormous help to me and my assistant. At the beginning we had a lot of questions on the position of the patient or the microscope. After all, it’s a totally different kind of treatment, a different world! And that’s why you have to watch somebody else working at the microscope first, then get some practice with it yourself before treating patients.

I value the Leica M320 dental microscope because it is ultra-compact and there’s no clutter of cables round the microscope to limit treatment space. I found the Leica M320 easier to use than other microscopes.

http://blog.naver.com/leica_micro/220738633649

BASIC DENTAL INSTRUMENTS


BASIC DENTAL INSTRUMENTS
Whenever you visit a dentist, you tend to notice the many different dental tools that are laid down beside the chair. A dental professional uses a variety of dental equipment for examining, cleaning, cutting and restoring teeth. Not many are familiar with these instruments therefore here is a quick guide on the basic dental instrumentsavailable in a dental office and their usage.
Dental instruments can be either hand-held or rotary (for example driven in a handpiece) and some can be of fiber optic light sources and ultrasonic equipment.

DENTAL HAND INSTRUMENTS

The types of hand instruments can be categorized based on their function:
  • Examining the mouth and teeth
  • Scaling or professional cleaning of teeth
  • Cutting teeth and removing cavities
  • Placing and condensing filling materials
  • Carving and finishing dental fillings
  • INSTRUMENTS USED FOR EXAMINING THE MOUTH AND TEETH

    © C3-IANS.BLOGSPOT.COM
    • Mouth mirrors are used to examine the condition of the teeth and mouth, as well as to retract the tongue and cheeks upon examination.
    • Probes– There are many probes available but the main types are the straight probe, Briault probe and periodontal probe.
      • The straight probe is sharp and it is used to examine cavities in the dentine region as well as to check the margins of restorations or fillings.
      • The Briault probe is also sharp and it is used to detect the junction between the enamel and dentine. Briault can also be used to detect tartar hidden in the gum pockets.
      • periodontal probe can be used to measure the depth of the gum pockets and for other measurements.

    INSTRUMENTS FOR CUTTING AND SCRAPING TISSUES AND DEPOSITS

    • Scalers remove tartar (calculus) on the tooth surface as well as those hidden in the gum pockets. They can also be used to remove other surface deposits and temporary crowns.
    • Excavators are used to remove softened dentine and temporary fillings. The back of the blade can also be used for placing linings between filling materials. Sometimes excavators can be used for carving metal or amalgam fillings.
    • Chisels are used to remove unsupported enamel during cavity preparation. Unsupported enamel can be harmful for it can compromise the longevity of the filling if not removed.
    • Hatchets and hoes have similar purposes to chisels.

      INSTRUMENTS USED FOR PLACING AND CONDENSING FILLING MATERIALS


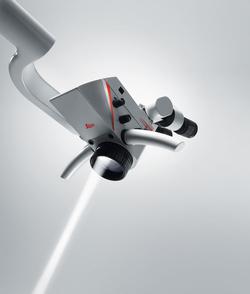
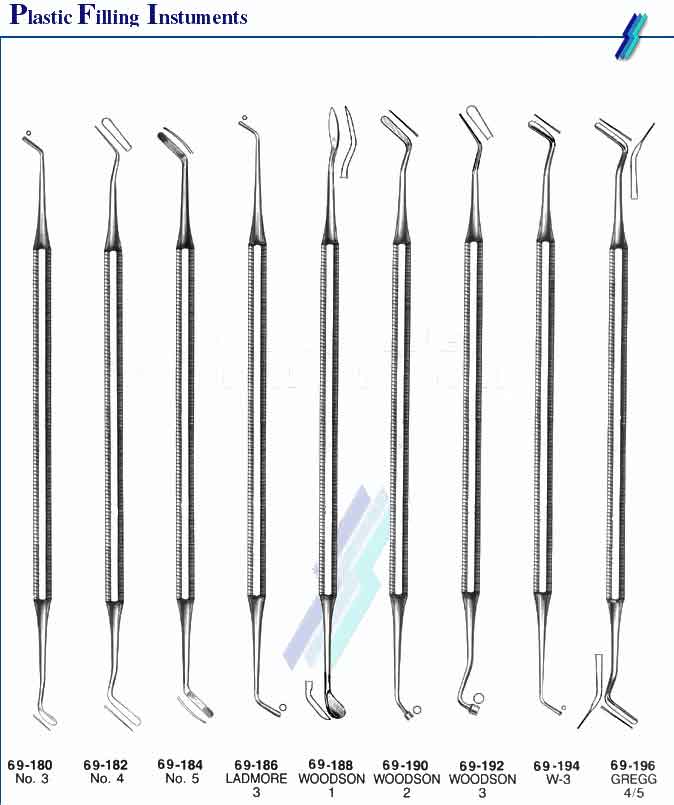
      • INSTRUMENTS USED FOR CARVING AND FINISHING FILLINGS
        Plastic instruments
         convey and shape filling materials and are usually flat blades that do not use heavy pressure. Some instruments have rounded ends for shaping and burnishing the surfaces of fillings. Plastic instruments are usually made of stainless steel for most materials though there are also thin Teflon-coated or titanium nitride instruments which are non-stick for composite fillings.
      • Condensers or pluggers are used for compressing and forming filling materials. Heavy pressure is applied on use therefore these instruments are usually used for metal or amalgam fillings.
      Carving and finishing instruments have sharp or semi-sharp blades of various shapes. They are used to carve materials by cutting and scraping.
    • GENERAL FEATURES OF HAND INSTRUMENT DESIGN

      Most of the hand-held instruments are made of stainless steel or sometimes carbon steel. Chisels and scalers often have tungsten carbide tips. The basic design of a hand instrument has a blade, a shank and a handle.

      ROTARY INSTRUMENTS


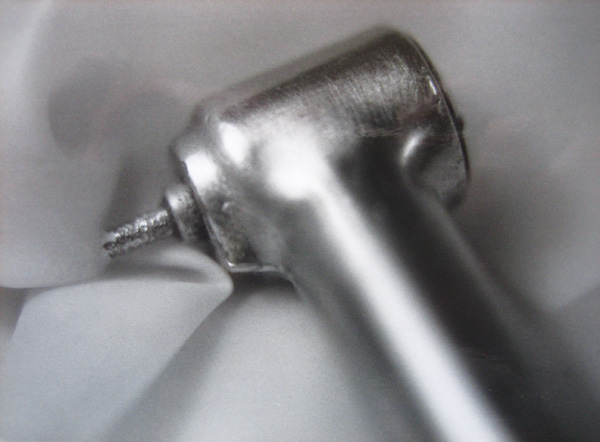
      THE AIR TURBINE (AIROTOR)
      Rotary instruments consist of burs, stones and discs. They are small instruments held in a handpiece. Rotation is made by electric motor or compressed air and is usually in two speeds: high-speed (air turbine) or low-speed hand pieces.
      High speeds between 250,000 to 500,000 rpm (revolution per minute) with low torque are seen in these instruments. A small air-driven turbine or rotor is mounted in the bearings and the shank of the bur is inserted into the rotor. The high-speed handpiece often has built-in water spray and fiber optic light.

      LOW-SPEED HAND PIECES

      There are two types of low-speed handpieces: a contra-angle handpiece which is nearly always used in the mouth, and the straight handpiece which is used in trimming procedures outside the mouth.  These handpieces have lower speeds (between 400 to 40,000rpm) but have more torque than airotor. Some can be of very high speed which uses water cooling. Low-speed handpieces are driven by electric motor or an air motor and can go clockwise or anti-clockwise, unlike the airotor.
    • http://www.intelligentdental.com/2011/10/12/basic-dental-instruments-2/